
BUSMASTER XCP: Prepare the environment and configure A2L
Applies to BUSMASTER 3.2.2.50. Screenshots use the Chinese interface; menu and button names below describe the corresponding controls.
1. Prepare the ECU, A2L and CAN connection
Section titled “1. Prepare the ECU, A2L and CAN connection”XCP reads variables inside an ECU and can modify parameters that allow calibration. An A2L file describes their names, addresses, types, conversions and access permissions. After loading the A2L, connect to the matching ECU to obtain live values.
This tutorial uses BUSMASTER 3.2.2.50 (Build 558), Simplified Chinese, with XCP on Classical CAN and a single ECU session. First read and continuously acquire two variables, then optionally practise writing a scalar parameter and reading it back.
| Requirement | Selection and preparation |
|---|---|
| BUSMASTER and analyzer | Install BUSMASTER and the analyzer driver. Check that the selected CAN channel is free. For initial device configuration, follow the basic transmit and receive tutorial. |
| ECU with XCP support | Obtain the matching A2L, bitrate, request/response IDs, access permissions and event channel from the ECU supplier. The addresses must match the ECU software. |
| Independent teaching setup (optional) | If an ECU is unavailable, use the supplied XCP ECU Simulator. The simulator and master each use an analyzer. Select the physically wired CAN channels and connect CANH, CANL and reference ground on the same bus. |
| Bus configuration | This example uses 500 kbit/s Classical CAN, with 120 Ω termination at each end. When joining an existing network, configure termination for its topology. |
Start the teaching simulator
Section titled “Start the teaching simulator”-
Download and fully extract the simulator ZIP. Keep the startup scripts, EXE, BMAPI.dll and test_xcp.a2l in the same directory.
-
Open PowerShell in that directory and list the channels:
Terminal window .\start_xcp_simulator.cmd -ListChannels -
Copy the simulator device UID into the quoted placeholder below, then start the selected channel.
-Channel 0means physical CH1.Terminal window .\start_xcp_simulator.cmd -Device '<simulator-device-UID>' -Channel 0 -
When
status=readyappears, check its device and channel and leave the window running. In the screenshots, the master uses physical CH3 of another device, mapped to logical CAN 1; the simulator uses physical CH1. When using other channels, keep wiring, startup arguments and software configuration aligned.
The example uses standard frames: master request ID 0x555, slave response/DTO ID 0x556, DAQ event channel 3, and a default period of 10 ms. When finished, press Ctrl+C in the simulator window and wait for it to exit normally.
Download the complete simulator ZIP
Simulator file information
Section titled “Simulator file information”Runtime version: Win32 Universal 20260903.
SHA-256: bc491b98154c2dc5528c9f8bfefdf03f5165da3bcb66a4288dba6bf29fdd6b49
The supplied A2L matches the teaching simulator’s address layout. For a real ECU, use the matching file from its supplier. Select EngineSpeed and SpeedLimit for the exercises.
2. Configure the main CAN channel and open XCP
Section titled “2. Configure the main CAN channel and open XCP”- Create a teaching project or save a separate copy of your existing project. Open the CAN tab, select the BUSMUST CAN driver, and choose the analyzer and physical channel wired to the ECU in hardware configuration.
- Configure Classical CAN, 500 kbit/s for the teaching simulator. For a real ECU, use its required bitrate and wiring. Keep the main CAN connection disconnected while configuring the curves.
- Open the main window through CAN → Advanced Protocols → XCP, then click Settings at the top.
Distinguish the physical channel from the logical software channel: CAN 1 in the screenshots maps to physical CH3. Select that logical CAN channel in XCP settings and check the device and 500 kbit/s shown alongside it. XCP shares BUSMASTER’s main CAN connection.
The A2L browser is on the left and the workset to be read is on the right. The bottom displays the operation hint and CAN, XCP ECU, measurement and A2L states. CAN connected, XCP ECU connected and measurement running are three separate states.
3. Load A2L and check connection and acquisition settings
Section titled “3. Load A2L and check connection and acquisition settings”- In XCP Settings → A2L, click Browse, select
test_xcp.a2lfrom the simulator package, and wait for loading to finish. - Confirm MODULE = TEST_ECU. If a real A2L has multiple MODULEs or XCP transport instances, select the one matching the ECU interface.
- Select the master’s logical CAN channel in the connection area and check the parameters below. The example A2L has no XCP_ON_CAN section; the interface reports that the current CAN IDs are retained, so enter the IDs manually.
- In the acquisition area, select Dynamic DAQ, set default event channel 3, and click OK to return to the main window.
| Setting | Teaching example | For a real ECU |
|---|---|---|
| Master CTO CAN ID | 0x555 | Master command request ID specified by the ECU |
| Slave response/DTO ID | 0x556 | Response and measurement-data ID specified by the ECU |
| 29-bit extended ID | Unchecked; standard 11-bit IDs | Match the ECU definition |
| Timeout | 500 ms | Use the ECU’s allowed communication timeout |
| Acquisition mode / event | Dynamic DAQ / 3 | Check supported modes and the event channel. Select polling to establish basic reading first. |
| Polling interval | 100 ms; disabled in Dynamic DAQ | Polling uses this interval; DAQ sampling is determined by the ECU event. |
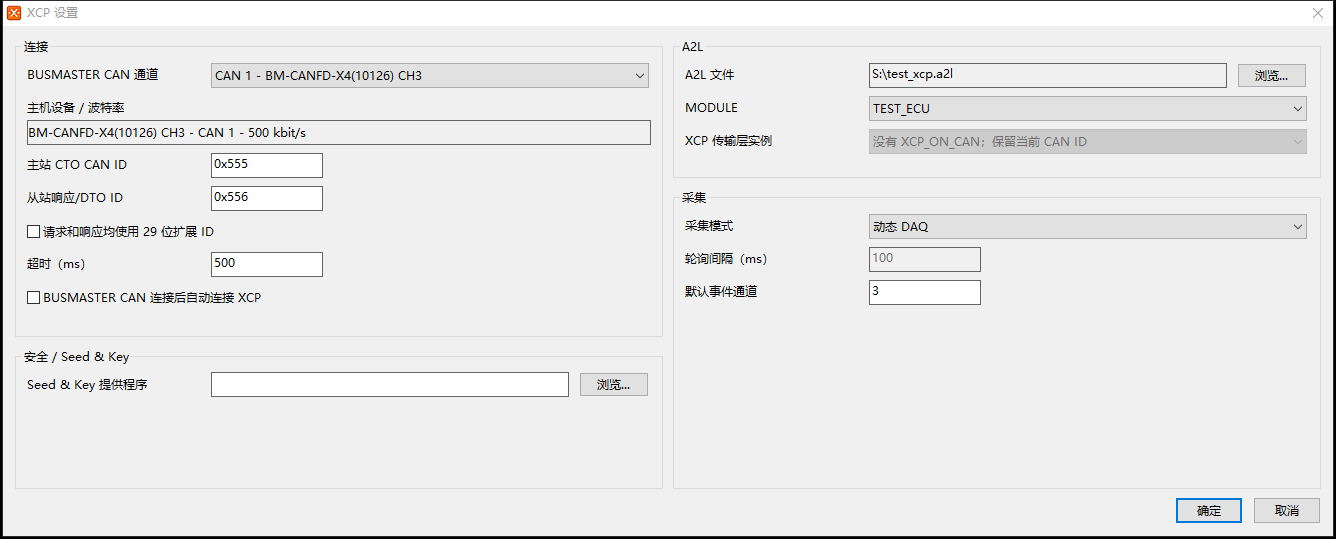
XCP settings: select the CAN channel and A2L, then configure CTO/DTO IDs and the DAQ event channel.
When A2L imports CAN IDs, identifier format or bitrate, check that these match the target ECU and main CAN configuration before applying them. If a bitrate mismatch is reported, correct the main CAN configuration before connecting.
If A2L import fails, note the error and time, then save the A2L diagnostics for your build. See Collect support logs and submit feedback.
Series overview · Next: Workset and physical-value curves
Use the download center for current and archived BUSMASTER releases.