
Database Editor
BUSMASTER database consists of information about expected messages. You can create or import a database of messages to be transmitted or received over CAN bus. For classic CAN, legacy DBF databases describe messages with up to eight data bytes. For CAN FD projects, BUSMUST recommends DBC databases because they can describe CAN FD frame attributes and payloads up to 64 bytes.
Each message has a unique ID and name. Each message can consist of one or more signals. In a message each signal has start bit and length, no two signals can overlap. Signal can have an offset, a multiplication factor and engineering units. These three information together are used to display signal value received in engineering units. The data received is multiplied by the factor, added to the offset to obtain the engineering value. Also a particular value of the signal can be given a meaningful name by using signal descriptor (e.g. ON = 1, OFF = 0). This information will be used while interpreting the messages.
User can create new BUSMASTER DBF database by selecting Tools-> CAN DBF Editor–> New menu option. This menu option will be enabled only when no database editor is open. For CAN FD databases, use DBC files as the primary database source.
User can also open a BUSMASTER DBF database by selecting Tools-> CAN DBF Editor–> Open menu option, or associate DBC databases from the CAN database menu where supported.
This will allow you to specify the database name, which you want to open and edit.
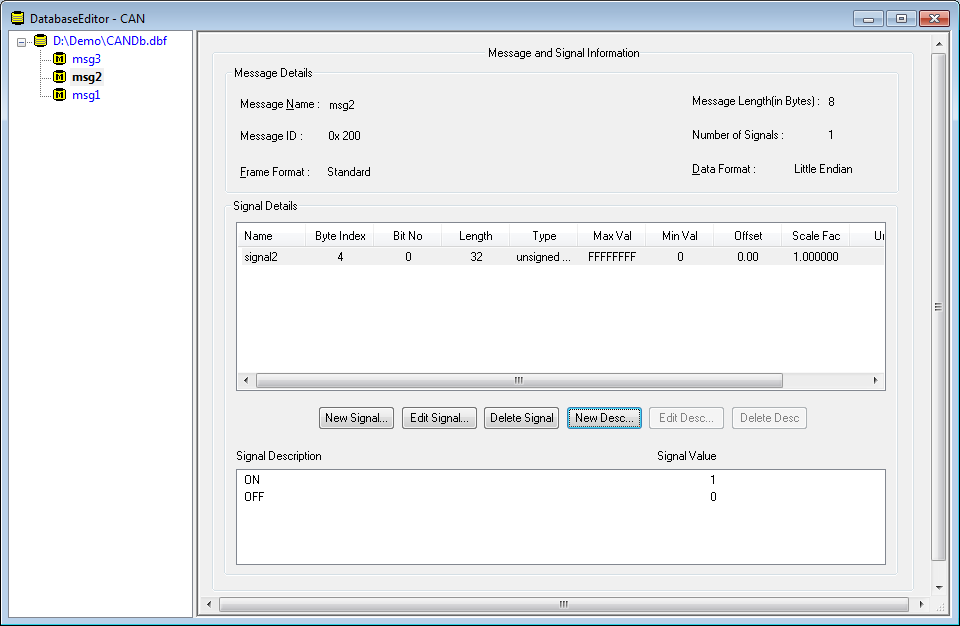
There are two panes in the database editor as shown in figure below.
Left Pane
Section titled “Left Pane”This will have the names of all messages listed in a tree fashion. Will be called Pane 1.### Right Pane
This pane will display the details of each message that you select from the Pane1. Will be called Pane 2.
By default no database is loaded. Once the user imports a database it will be stored across sessions. This is called the active database, which will be used for interpretation and by the function editor.### Import Database
User can select any number of BUSMASTER generated database and make them as active databases. Select CAN –> Database –> Associate menu option. An open file dialog will be displayed. Select the databases and click on Open button.### Dissociate Database
User can Dissociate any number of active database from the application. Select CAN –> Database –> Dissociate menu option. Following dialog box will be displayed: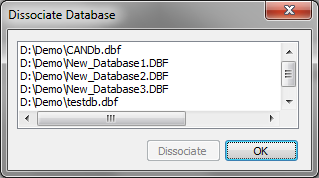 Select the databases and click on Dissociate button.### Add Message
User can add new messages to the database following the steps given below Select root item in Pane 1 and right click. A pop-up menu will be displayed. Select New Message menu option. A dialog box will be displayed. Key in all the details and select OK button.
The new message name is added as last item in the Pane 1 and the details are displayed in the Pane 2.### Edit Message
User can edit messages in database by following the steps given below Select message name to be edited in Pane 1 and right click. A pop-up menu will be displayed. Select Edit Message menu option. A dialog box will be displayed with all the message attributes displayed. Key in all the details and select OK button.
The new message name will be added as last item in the Pane 1 and the details are displayed in the Pane 2.### Delete Message
User can delete messages in database by following the steps given below Select message name to be deleted in Pane 1 and right click. A pop-up menu will be displayed. Select Delete menu option. A delete confirmation message will be displayed. Select Yes.
The message name is deleted from Pane 1 and the details are displayed in the Pane 2.### Add Signal
Message consists of signals. To define a signal in message follow steps given below Click the message name for which you want to add the signal from the Pane 1. The details of the message will be displayed in the Pane 2. Right click in the signal details list in Pane 2. A pop-up menu will be displayed. Select New Signal menu option. A signal details dialog box will be displayed. Key in the signal details and click on OK button.
The new signal and its attributes are displayed in the signal details list. Selecting New Signal button will do the same.### Edit signal attributes
User can edit the attribute of a signal define earlier, please follow the steps below to do so Click the message name for which you want to edit the signal attributes from the Pane 1. The details will be displayed in the Pane 2. Select the signal in the signal details list in Pane 2. Right click. A pop-up menu will be displayed. Select Edit Signal menu option. A signal details dialog box will be displayed. Key in the signal details and click on OK button.
The changes are displayed in the signal details list for the selected signal. Selecting the signal details from the list and clicking on Edit Signal button will do the same.### Deleting a signal
User can edit the attribute of a signal define earlier, please follow the steps below to do so Click the message name for which you want to delete the signal from the Pane 1. The details will be displayed in the Pane 2. Select the signal in the signal details list in Pane 2. Right click. A pop-up menu will be displayed. Select Delete menu option. A delete confirmation message will be displayed. Select Yes.
The signal and its attributes are deleted from signal details list in Pane 2. Selecting the signal details from the list and clicking on Delete Signal button will do the same.### Add Signal description
User can add the give description for a value of a signal , please follow the steps below to do so Click the message name for which you want to add description for the signal from the Pane 1. The details will be displayed in the Pane 2. Select the signal in the signal details list in Pane 2. Right click. A pop-up menu will be displayed. Select Add Description menu option. A dialog box will be displayed. Enter description and the signal value and click on OK button.
The new signal description and value are displayed in the signal description list. Selecting the signal details from the list and clicking on New Desc button can do the same.### Edit Signal Description and Signal value
User can edit the give description for the value of a signal, please follow the steps below to do so Click the message name for which you want to edit description for the signal from the Pane 1. The details will be displayed in the Pane 2. Select the signal description and value from the signal description list in Pane 2. Right click. A pop-up menu will be displayed. Select Edit Description menu option. A dialog box will be displayed. Enter description and the signal value and click on OK button.
The changes in signal description and value are displayed in the signal description list. The same can be done by selecting the signal details from the list and the description to be edited and by clicking on Edit Desc button.### Delete
User can delete Signal description and Signal value by following the steps given below Click the message name for which you want to delete description for the signal from the Pane 1. The details will be displayed in the Pane 2. Select the signal description and value from the signal description list in Pane 2. Right click. A pop-up menu will be displayed. Select Delete Description menu option. A delete confirmation message will be displayed. Click on Yes button.
The selected signal description and value are deleted from the signal description list. The same can be done by selecting the signal details from the list and the description to be deleted and by clicking on Delete Desc button.### Save database
User can save the database to a file by selecting CAN –> DBF Editor –> Save or by clicking on the tool bar button shown below.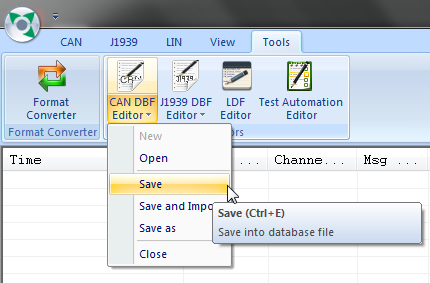
User also have an option to save the file at different folder location with different name. You can do this by following the steps given below. Select CAN DBF Editor Save As menu option. A save as file dialog box will be displayed. Enter the file name. Click on Save button.### Closing database editor
Select CAN DBF Editor Close menu option to close any opened database file. Or click on [X] button at the right upper corner of the database window.
Authoritative source: BUSMASTER DITA help source database_editor.dita, compiled into BUSMASTER.CHM with the application.