
Test Setup Editor
Test setup Editor is useful to create and edit a test setup file. Here is the list of different services rendered by the editor.
Features provided by test setup editor
Section titled “Features provided by test setup editor”- Create a new test setup file
- Save a test setup file
- Load an existing test setup file
- Create, edit and update a test case
- Define a test case by adding its sub nodes like send, wait, verify, and replay
- Reposition a test case
- Delete a test case
- Create, edit, and update a new test case node
- Adding, deleting a send message to send node
- Initialization of a send message node
- Adding and deleting a verify message node to verify node
- Create a validation procedure for each signal in the verify message
- Create a wait node
- Repositioning a test case sub node
- Copy, cut, paste operation on Test case and its sub nodes
- Validate the test setup file### Invoking Test setup editor
To open the test setup editor, In BUSMASTER click on menu Item Tools->Test Automation Editor.
The first look of Automation Editor will be as shown in the figure below. To make things easier the BUSMASTER Menu will be replaced with the Test Automation Editor.
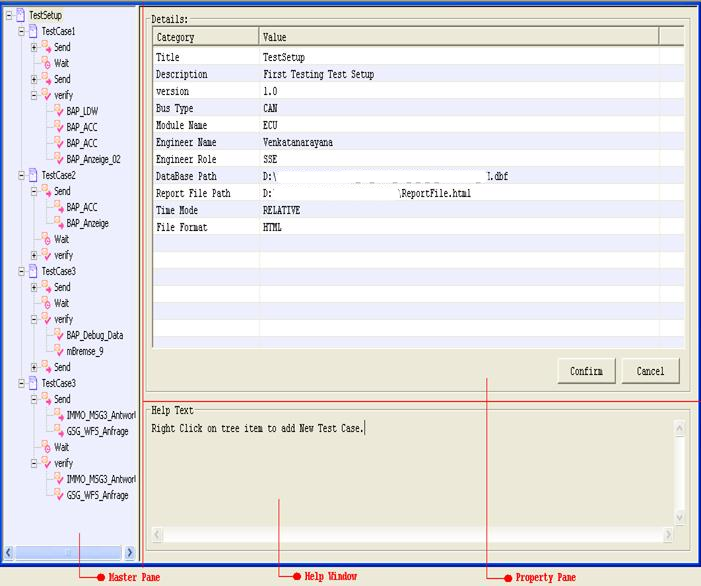
Master Pane: The master pane or right pane can be used to add or update the test cases.
Property Pane: The user can use the Property pane or Left pane to update the details of a Test case or its sub nodes.
- It contains a table with two columns Category and Value. The value in Category field can not be changed and it’s like a question. To update the value in any row of Value column double click on the cell item. An edit box or a list control will appear according to the context.
- Also the pane contains two buttons Confirm and Cancel. The Confirm button can be used to save the current changes made to the node. Note that these changes will not be saved to file. For saving into a file select File Save (see following section for menus). The Cancel button Will cancel all the changes made and display the previously saved data.
Help Window: The help window will provide help on every node. Click on any item on right pane to get the details of that node.### Test Setup Editor Menu
The functionalities, provided by the Test Setup editor, are grouped under the Test setup editor Menu. This Menu will be shown in BUSMASTER when the editor is in active mode or user clicked on the Editor.
File : The File menu contains all most all the functionalities provided by the editor. It contains the following sub menus.
- File New : Use to create a new test setup file. Ctrl + N is the keyboard short cut.
- File Open : Use to Open an existing test setup file. Ctrl + O is the keyboard short cut.
- File Close : Closes the current file.
- File Save : Saves the current changes to the file. Ctrl + S is the keyboard short cut.
- File SaveAs : Saves the current data into another file.
- File Validate : Validates the current file according to the table under Test Setup File.
- File Exit : Closes the editor.
Edit : The Edit menu will provide the operations such as cut, copy, and paste.
- Edit Copy : Any item on the right pane can be copied using this menu. Ctrl + C is the keyboard short cut.
- Edit Cut : Using this menu any item on the right pane can be deleted by copying it. Ctrl + X is the keyboard short cut.
- Edit Paste : The copied item can be inserted under any parent item by selecting the parent item and this menu. For example the copied
send_messagecan be inserted in any send node of any test case.
Display : The Display menu is used to customize the GUI.
Help : The Help menu provide the version details about the editor and also opens this help file.### Using Editor
- Creating a new test setup file: Select File New menu. A file browser will be displayed. Select a required folder and enter the file name. Click on OK. The editor will create a new test setup file and a new test setup with some initial values.
- Updating test setup: Initially the name of test setup will be
displayed in right pane. Click on this item (test setup node) and update its details such as test setup name, description, version, bus type, module name, engineer info, report file path and database in left pane. The database path is very important. - Creating a test case: Right click on the test setup node on right pane. A pop up menu will appear click on New Test Case. A new test case with Initial name Untitled TestCase will be created.
- Updating a test case: Click on required test case node. The left pane will show the details of test case and you can edit the details and click Confirm button.
- Deleting a test case: Right click on required test case node. A pop up menu will displayed. Click on Delete item. The test case will be deleted from the test setup.
- Adding a new test sequence: Right click on required test case node. A pop up menu will be displayed. Click on New menu and select the required node.
- Updating a test sequence: Click on any test sequence item. And edit its detail in left pane and click on Confirm button.
- Deleting a test sequence: Right click on any test sequence item. A pop up menu will appear. Click on Delete item to delete the node.
- Adding a message: To add the messages in send, verify etc nodes, Click on the required send node. Double click on the [Add message] cell on right side. If a database is added in the Test setup node, A list box containing the messages will appear. Select a message to add in list. After adding a new row with [Add Message] will be added in list box in order to add another message.
- Delete a message: To delete a message double click on that message. Select [Delete Message] in list in order to delete the message.
Authoritative source: BUSMASTER DITA help source test_setup_editor.dita, compiled into BUSMASTER.CHM with the application.