
Function Editor
BUSMASTER can work as a programmable node over a CAN bus. User can program different event handlers using function editor. The programming language is C.
Five types of event handlers are supported. Message Handlers Timer Handlers Key Handlers Error Handlers DLL Handlers
These function handlers when built and loaded are executed on Receipt of a Message. Elapse of a time interval. Press of a Key Detection of error or change in error state Loading / unloading of DLL.
User can also include Header File names, add Global Variables and Utility Functions while programming the event handlers. All these functions can be edited and saved in a file with extension “.c”. The source file can be built to a DLL. This DLL can be loaded dynamically.
There are three panes in function editor as shown below Left Pane : Will be called Pane 1. Right Top Pane : Will be called Pane 2. Right Bottom Pane : Will be called Pane 3.
Pane 1 displays the list of functions, included header files and global variables defined. Pane 2 displays the contents of the source file. Through Pane 3 User can edit the body of function selected.
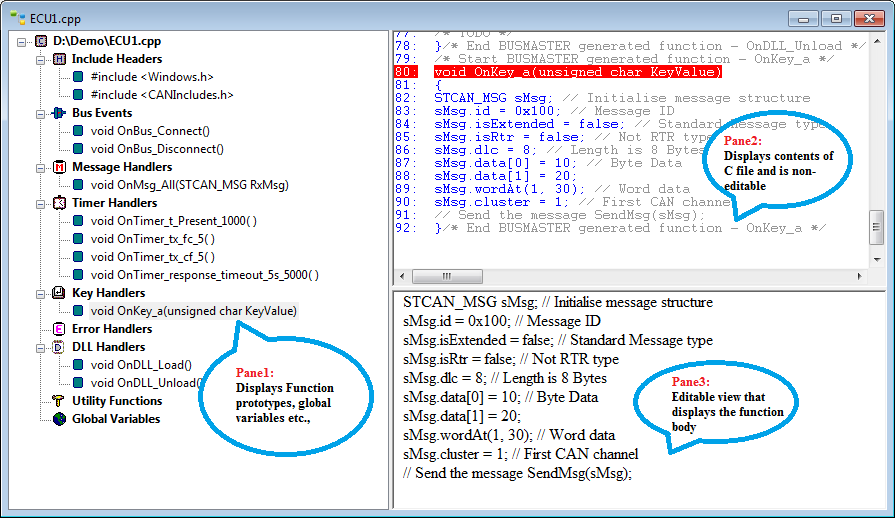
General access to the function editor
Section titled “General access to the function editor”Go to CAN –> Node Simulation –> Configure to open the window Configure Simulated Systems. Right click on CAN Bus in the left pane and select New Simulated System or Add Simulated System . Select then the “sim” file.
Right click on the new simulated system and select Add Node . The name will also be used as basename for the generated DLL. The Node Details will become visible in the right pane.### Create a new function
Follow the description in the previous chapter “General access to the function editor”.
Select Add New File… in the right pane under File Details to add new functions to the node. The function editor will open automatically.### Edit an existing function
Follow the description in the previous chapter “General access to the function editor”.
Select Edit File… in the right pane under File Details to edit an existing function of the node.### Include Header file
User can include a header filename while programming event handlers. To do so please follow the steps given below: Select Include Headers category in the Pane 1 and right click. A pop-up menu comes up. Select Add. A dialog box appears. Click on Browse button to select the required header file name and click on OK button. The selected header filename will be added to the source file in the Pane 2 and also under Include Headers category in Pane 1.### Edit Include Header File Name
User can edit the name of the header file, to do so please follow the steps given below Select the Include Header filename under Include Header category to be edited in the Pane 1 and Right click. A pop-up menu will be displayed. Select Edit. A dialog box will be displayed. Click on Browse button to select the required header file and click on OK button.
The selected header file will be replaced with the previous header file in the source file in the Pane 2 and also under Include Headers category in Pane 1.### Delete Handlers
User can delete Header files, Message Handlers. Timer Handlers, Key Handlers, Error handlers, DLL handlers and Utility Functions in source file opened for editing, to do so follow the steps given below: Select the item to be deleted in the Pane 1 and right click. A pop-up menu will be displayed. Select Delete. A confirmation message is displayed. Select Yes.
The selected item’s definition will be deleted from the source file in the Pane 2 and also in Pane 1.### Add Message Handler
- Select Message Handlers category in the Pane 1 and right click.
- A pop-up menu will be displayed.
- On selecting Add menu. A dialog as shown below pops up.
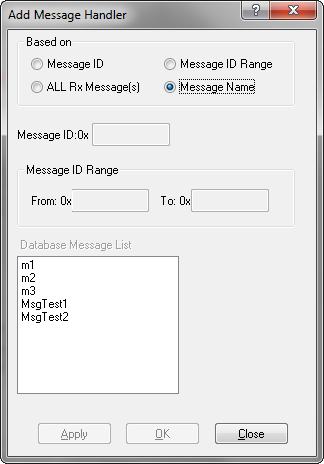
- From this dialog message handlers of different type can be selected. The different types of message handlers supported are Message handler based on the message name. Message handler based on message ID. Message handler based on range of message ID. Message handler for all received messages.
The type of message handler can be selected using the radio buttons. To add handler based on the message name the corresponding message should be available in the imported database. Multiple messages can be added from this dialog box by clicking on Apply button after selecting a message handler.
Function definition will be added to the source file in the Pane 2 and the prototype under Message Handlers category in Pane 1.### Add Timer Handler
- Select Timer Handlers category in the Pane 1 and right click.
- A pop-up menu will be displayed.
- Select Add. A dialog box appears.
- Enter Timer Handler Name like e.g., “Time_One” and the Timer Value in milliseconds.
- Select OK button.
- Function definition will be added to the source file automatically in the Pane 2 and the prototype under Timer Handlers category in Pane 1.
Note: Adding a Sleep function inside a Timer handler might have an adverse effect on the application. Maximum of 16 timers can run simultaneously in cyclic mode. Anything above 16 will fail to start.### Add Key Handler
- Select Key Handlers category in the Pane 1 and right click.
- A pop-up menu will be displayed.
- Select Add. A dialog box appears asking the user to press a key.
- Press a key for which User want to write the handler. The same will be displayed in the dialog box.
- Select OK button or Apply button if more key handlers are to be added from the same dialog.
Function definition will be added to the source file automatically in the Pane 2 and the prototype under Key Handlers category in Pane 1.### Add Error Handler
- Select Error Handlers category in the Pane 1 and right click.
- A pop-up menu will be displayed.
- Select Add. A dialog as shown below pops up from this dialog select the type of error handlers to he handled by your program and click on OK button.
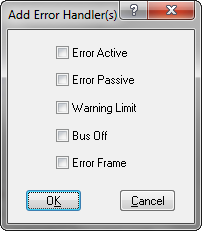
Function definition will be added to the source file automatically in the Pane 2 and the prototype under Error Handlers category in Pane 1.### Add DLL Handler
DLL handlers are invoked at the time of loading the DLL or while unloading the DLL. The procedure for adding DLL handlers is similar to that of adding error handlers.### Add Utility Function
- Select Utility Functions category in the Pane 1 and right click.
- A pop-up menu comes up.
- Select Add. A dialog box appears.
- Return Type of the utility function can be selected from the combo box or directly typed. The combo box will have primitive data types and database message structure names.
- Enter the Function Prototype in the Edit control like e.g., “Func_One( int a, int b )”.
- Select OK button.
Function definition will be added to the source file automatically in the Pane 2 and the prototype under Utility Functions category in Pane 1.### Global Variables
To add/delete/modify global variables follow the steps given below.
- Select Global Variables category in the Pane 1 and double click.
- The Pane 3 will become editable and will show global variable block.
- Change this block to Add/Delete/Modify the global variables.
Variable declaration will be added to the source file automatically in the Pane 2.
Note: Use global variable block to use macros, structure or union definitions. The scope of variables and definitions given in this block is throughout the program.### Edit Function Body
User can edit any function body by double clicking the prototype of the function displayed in Pane 1. On double click of the function prototype, the function body will be displayed in the Pane 3 and will be ready for editing.### Variable of Message Type
BUSMASTER defines structures for messages define in the database. User can use these structures while programming. Please follow the steps below to add variable of the message type Edit the function for which database message name is to be added. (Refer: section Edit Function Body) Right click in the Pane 3. A pop-up menu is displayed. Select Insert Message. A dialog box is displayed with all the database messages under Message list. Choose a message from the list. Select the check box option in the dialog box. Click on Select button.
The selected message variable will be displayed in the Pane 3 and the same is updated in the Pane 2.### Insert Message name
User can add a tag of message structure and this could be used for defining variables. Please follow the steps below to insert a message structure tag into the function. Edit the function for which database message name is to be added. (Refer: section Edit Function Body) Right click in the Pane 3. A pop-up menu is displayed. Select Insert Message. A dialog box is displayed with all the database messages under Message list. Choose a message from the list and click on Select button. The selected message will be displayed in the Pane 3 and the same is updated in the Pane 2.### Insert Signal name
User can use signal names while programming. The signal names have to be used in conjunction with the corresponding message variable. It is member of message structure. Please follow the steps below to insert a signal name into the function. Edit the function in which signal name is to be added. (Refer: section Edit Function Bodyedit_function_body) Right click in the Pane 3. A pop-up menu is displayed. Select Insert Signal. A dialog box is displayed with all the database messages under Message list. Choose a message from the list. A list of signals will be displayed under Signals list. Select a signal and click on Select button. The selected signal will be displayed in the Pane 3 and the same is updated in the Pane 2.### Insert a Function
BUSMASTER provides API functions, which can used while programming. These functions can be used to interact with BUSMASTER application. Please follow the steps below to insert a function Edit the function for which prototype is to be added. (Refer: Editing Function Body) Right click in the Pane 3. A pop-up menu is displayed. Select Insert Function. A dialog box is displayed with a set of function prototypes. (API Listing) Choose required function prototype from the list and click on OK button. The selected function prototype will be displayed in the Pane 3 and the same is updated in the Pane 2.
Authoritative source: BUSMASTER DITA help source function_editor.dita, compiled into BUSMASTER.CHM with the application.