
CANopen Commissioning: From EDS to Device Integration and Acceptance
BMCLI combines CANopen device definitions, object access, and network observation to support node connection and integration. Using a robot actuator, this article shows how AI can organize these checks into a dedicated tool and acceptance report.
Imagine a robot whose mechanical and electrical assembly is ready. The control team receives the drive’s EDS and object dictionary documentation and must confirm consistency with the robot controller’s interface. With device power, CAN wiring, a BUSMUST analyzer, the EDS, and expected node ID, AI can use BMCLI for passive observation and selected object reads.
This check neither enables motion nor changes drive parameters. After identity, state, and PDO comparison, schedule parameter changes or control experiments according to the device manual. Teaching-node data illustrates the method; project documents provide the robot model, actual object meanings, and motion conditions.
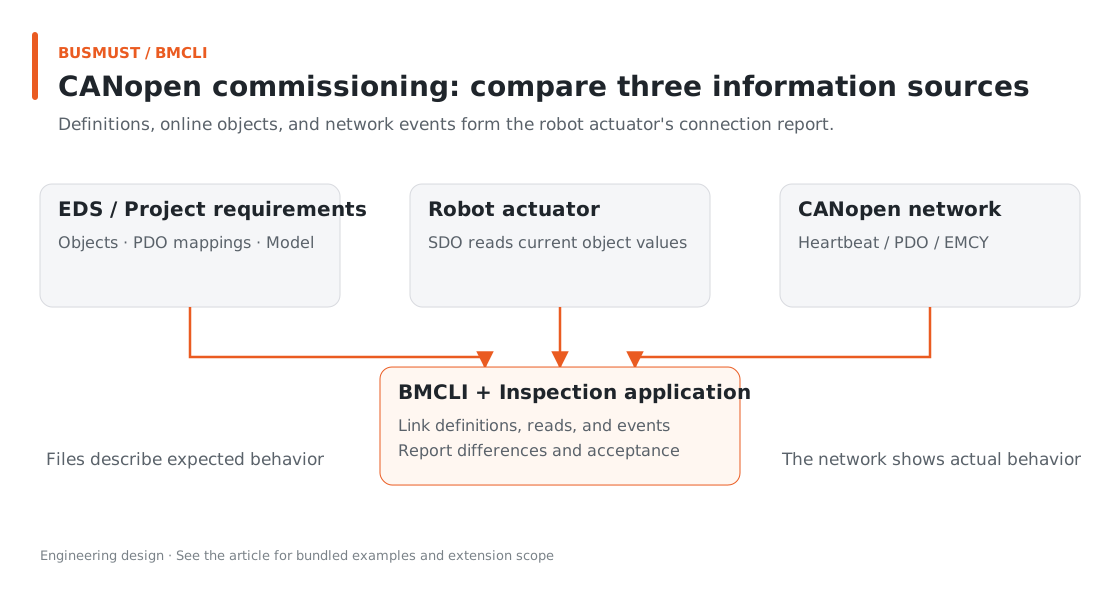
Figure 10-1. Device definitions, active reads, and passive observations each have distinct sources. Engineering relationship diagram.
Input for AI: Describe the Node Check
Section titled “Input for AI: Describe the Node Check”Provide the device EDS, canopen-can network in Bench, expected node ID, and object list. The request explicitly authorizes passive observation and selected reads; parameter writing is outside this task.
Use BMCLI and tutorial-node.eds to generate a commissioning report for Node-ID 1 on canopen-can. Take connection details from the project Bench. Observe passively for 5 seconds, summarizing Boot-up, Heartbeat, PDO, and EMCY. Then read Node 1 identity objects, 0x1017, and 0x2000, and compare online TPDO1/RPDO1 with the EDS. Perform only these observations and reads: no parameter writes or NMT state changes. Label EDS definitions, device-read values, and passive observations separately and show them side by side with differences and relevant records.
AI checks the EDS, then organizes observation, reads, and comparison. The bundled EDS and acceptance plan provides teaching definitions; execution also requires a matching CANopen node.
Finished Result: Bring Three Sources Together
Section titled “Finished Result: Bring Three Sources Together”AI should produce a commissioning report comparing definitions, online values, and observations. The teaching node below illustrates the structure and key data so their sources remain clear.
This example uses Node-ID 1 and the public teaching EDS. Compare identity, Heartbeat, vendor objects, and PDOs as follows:
| Item | Example EDS definition | Online confirmation needed |
|---|---|---|
| Identity 0x1018 | Vendor=1, Product=2, etc. | Actual identity of the current node |
| Heartbeat 0x1017 | Default 1000 ms | Online parameter and measured period |
| Vendor object 0x2000 | U8, range 0..255 | Current value and access result |
| TPDO1 | COB-ID 0x181, one mapped byte | Online communication and mapping objects |
| RPDO1 | COB-ID 0x201, one mapped byte | Whether receive mapping meets project requirements |
| EMCY | Error-event parsing | Events within the observation window |
A common situation is an EDS default of 1000 ms while the node is configured for 500 ms. Placing the default, online value, and measured period side by side helps engineers distinguish an expected configuration difference from an issue.
Implementation Explained: BMCLI’s Role in the Tool
Section titled “Implementation Explained: BMCLI’s Role in the Tool”The key calls below explain the implementation. AI-generated code organizes them into a complete workflow, processes responses, and handles cleanup.
From Passive Observation to Active Reads
Section titled “From Passive Observation to Active Reads”# Load the database as a named resource for later decoding or protocol operations.bmcli database load --file=tutorial-node.eds ` --name=tutorial-node --type=canopen# List the EDS object dictionary: device definitions, not live readback values.bmcli canopen object list --database=tutorial-node --format=json# Inspect EDS PDO definitions as the baseline for online comparison.bmcli canopen pdo list --database=tutorial-node --format=json
# Enable CANopen parsing and event recording, setting the expected heartbeat period.bmcli canopen enable --channel=canopen-can --database=tutorial-node ` --heartbeat-producer=1:1000 --history-events=4096# Observe passively for five seconds and summarize nodes and network events.bmcli canopen node discover --channel=canopen-can --duration=5 --format=json# Inspect heartbeat state and timeout information for the selected node.bmcli canopen heartbeat status --channel=canopen-can --node-id=1 --format=json
# Read node identity objects and compare with project expectations.bmcli canopen node identify --channel=canopen-can --node-id=1 ` --database=tutorial-node --format=json# Actively read teaching object 0x2000:0 to obtain its current device value.bmcli canopen sdo read --channel=canopen-can --node-id=1 ` --index=0x2000 --sub-index=0 --database=tutorial-node --format=json# Compare online PDO mapping with the EDS to check definition/configuration consistency.bmcli canopen pdo verify --channel=canopen-can --node-id=1 ` --database=tutorial-node --direction=tpdo --pdo-number=1 --format=jsonenable creates a passive parsing view; discover finds nodes in natural traffic. Identity reads, SDO reads, and PDO verify send requests to the selected node. Separating those actions makes information sources clear in the report.
EDS supplies object types, access rights, and mapping definitions. BMCLI handles CANopen communication and result interpretation. AI-generated tools can organize the UI around object names and engineering meanings rather than repeated COB-ID and byte lookups.
pdo verify --apply saves verification results in BMCLI’s local observation session for subsequent observation. To change ECU mapping, organize SDO writes and state transitions according to device requirements.
Make Commissioning Judgments More Accurate
Section titled “Make Commissioning Judgments More Accurate”The 1000 ms Heartbeat value is an example baseline. In a real project, read 0x1017 first and set deadlines using device requirements. No Boot-up in the window may simply mean the node started earlier; record “event not observed” separately from “node failure.”
With identity and read-only results established, write tests are easier to organize. If a response is interrupted after an SDO write, read the object back before deciding whether it completed. Explicitly select the target node for NMT changes to keep their scope clear.
Explore Further: From Commissioning Records to Device Acceptance
Section titled “Explore Further: From Commissioning Records to Device Acceptance”You can refine this example or extend it to other work. Choose a direction that interests you and discuss its implementation with AI.
Generate Acceptance Configuration by Product Model
Section titled “Generate Acceptance Configuration by Product Model”If a bench supports different node models, ask AI to organize expected identities, key object values, Heartbeat requirements, and PDO definitions into model configurations. Read actual values with BMCLI and compare them, showing EDS definitions separately from device responses. For writes or NMT changes, define separate steps and conditions using the manual. A commissioning record can then grow into a reusable incoming-inspection or bench-acceptance tool.
Add Context to EMCY Events
Section titled “Add Context to EMCY Events”An EMCY code often states only the outcome. Ask AI to retain PDO and Heartbeat records during observation, attach nearby frames and known states, and interpret them using vendor error definitions. Schedule any necessary object reads through the diagnostic workflow and label them as post-event state. This produces contextual event records for investigation rather than an isolated alarm list.
Further Reading
Section titled “Further Reading”These references cover the interfaces used here; query local JSON Help for individual parameters.
Download this tutorial’s companion examples (ZIP)